Sunday, 14 April 2013

How to shuck a scallop

OK, I know that scallop season is over. But, I didn't get around to doing this during summer so here it is now. Come 15 July the season will be open again down in Wellington anyway. That's only three months away, oh yea!

I love scallops. Like, seriously love them. Fried with butter and garlic. In a mornay. Seared with a creamed corn sauce. And always, always with a crispy glass of white wine on the side. Ah, bliss.

As well as eating them, I love collecting scallops, they are super fun to 'catch'. I say 'catch' because there is not a lot of catching going on, more 'picking up'. They sit nestled in the sand, hiding away. You need to be beady-eyed, searching them out.

Anyway, once you have your (legal) haul of scallops you need you get the little parcels of deliciousness out of their shells. Now, there are plenty of different ways to do this. Below is a step-by-step guide to doing it my way, or more correctly, the way my family does it. You might find that your uncle's neighbour's son does it differently, that's fine. There is no 'correct' way, but you want to make sure you end up with a nice neat scallop and you're not wasting any of the precious meat by leaving it on the shell. We find this way works well, but feel free to modify if another way suits you better.

You will need a blunt pairing knife, or a bread and butter knife and some sea water to rinse them (please, please ever don't rinse fresh seafood in fresh water unless you absolutely have to, it really does destroy the flavour).

First you will need to lie your scallops out belly-down so they open up. We leave them to open while we are rinsing our dive gear - by the time we are done they are good to go.


Hold the scallop in your hand, belly-down. You need to be pretty speedy on the first step, if you're too slow they will close up and you will have to set them aside and wait for them to open again.


Quickly slice the knife in under the belly, releasing the muscle from the shell. You want to make sure you get right under it so you don't leave any of the muscle on the shell.


Once the muscle is released, the whole thing will relax and you will be able to open the scallop right up.


This will leave you with the scallop on the flat side of the shell.


Cut the black belly of the scallop off.


You should now be able to pull the scallop away cleanly from the shell, leaving behind the 'gunk' that you don't want.


All done! Pop your scallop into a bowl of sea water while you are shucking the rest and give them a gentle swirl - this will make sure they are nice and clean. Drain on a paper towel and cook them up that day! Delicious!


Many thanks to my brother for his expert demonstration :-)

Friday, 12 April 2013

Fruit Bread French Toast


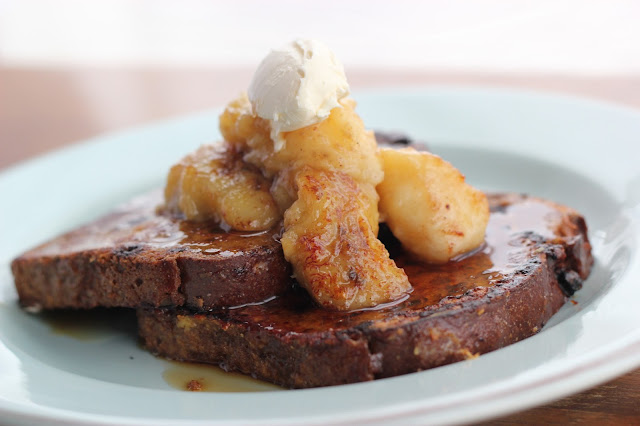
In the final installment of my Easter weekend breakfast bonanza, I present Fruit Bread French Toast with caramalised bananas! Yes, it's as delicious as it sounds.

This is basically the sweet version of your traditional French Toast. Fruity, sweet, tasty.

Come next Easter, you could totally do this with hot cross buns. I'd flatten them a bit, just with your hand, and then just follow the directions below.

I slathered my french toast with maple syrup (the real stuff, not the imitation - it's a bit more expensive, but totally worth it) and topped it with whipped cream cheese. If whipped cream is your thing, a dollop of whipped cream would also be fantastic.

To make this mouth-watering breakfast for two you will need:

4 slices fruit bread toast (I use Vogels gluten free)
2 eggs
1 teaspoon cinnamon
4 tablespoons milk
2 bananas, sliced (on a diagonal is pretty)
Butter

Beat the eggs, cinnamon and milk together, make sure it's well mixed.

Heat about a teaspoon of butter in a non-stick frypan over a gentle heat (you don't want the butter to burn).

Quickly dunk your bread in this mixture (you have to be quick here, push it into the egg mixture for about 2 seconds max), flip and dunk the other side and then hold it above the egg to let it drain well.

Pop it in the hot frypan and fry until brown and the egg is set. Flip and cook the other side. Remove from the heat, add some more butter and crank up the heat. Fry the banana slices until caramalised and soft - it won't take very long so watch it closely.

Serve up your Fruit Bread French Toast with lashings of maple syrup and your bananas.


Saturday, 6 April 2013

Mexican Eggs

My eggs with chorizo, capsicum and tomato was another part of my Easter breakfast bonanza - a delicious, decadent breakfast every day of Easter, yum. This was actually day one. And it was a good start.

I have called this Mexican eggs as the flavours remind me of Mexican-inspired food. I have never been to Mexico (although I hope to one day) so I have no idea how authentic this is. But Mexican eggs is easy to remember, so there you go. 

This is super easy to make, and pretty quick too. It's a fabulous weekend breakfast as you can afford to be super lazy. It's not one of those recipes you need to watch like a hawk - not something you want to be doing blurry-eyed first thing on the weekend! Weekends are for relaxing and unwinding and de-stressing. This will do the trick. 

I don't eat onions, but if you do I would totally recommend adding them to this dish. But, you don't have to. I didn't and it was still delicious. I cooked us two eggs each because we were feeling greedy. If you served this with toast, you could easily have one egg per person for a filling breakfast. 

You need:
1 large capsicum, sliced thinly
2-4 cloves of garlic crushed (depending on how much you love garlic)
1 stick of chorizo, sliced
1 tsp paprika
3 tomatoes, chopped
1 tablespoon chopped parsley
4 eggs
salt and pepper
olive oil   

Heat a dash of olive oil in a frying pan over a medium heat and turn your oven on to grill at a high heat (about 200 degrees). 

Put the chorizo, capsicums and garlic (and onions if you're using them) in the frying pan and cook until the capsicums are soft. Add the paprika, tomatoes, parsley, salt and pepper and cook until the tomatoes are soft, about five minutes. 

Make four dents in the capsicum mixture and crack an egg into each one. Cook for two minutes and then pop under the grill for another two to three minutes until the eggs are just cooked. You still want the yolks runny when you serve it (unless you don't like runny yolks - by all means cook the eggs to your liking). 

Serve immediately - yum! Enjoy your weekend, sit back and relax. 


Thursday, 4 April 2013

Peanut Butter and Nutella Cookies (gluten free)

I love peanut butter. Seriously love it. I'm pretty sure just about everything tastes better with peanut butter. Well, perhaps I am exaggerating a little... But only a little. Cookies definitely taste better with peanut butter!

Here is my recipe for delicious peanut butter Nutella cookies. The best thing is they have no flour! If you want more of a peanut butter kick, replace the Nutella with peanut butter. Yum!

1/2 cup peanut butter (crunchy or smooth - you choose)
1/2 cup Nutella
1 cup of caster sugar
1 egg

Preheat you oven to 170 degrees and line a tray with baking paper. Beat everything together until well mixed. Drop spoonfuls onto the tray (the mixture will be quite sticky), make sure you don't place them too close. Bake for 10 minutes for a chewy cookie, 12-15 minutes for a crunchy cookie.

If you're a chocolate fan, chocolate chips added to the batter would be delicious. But, they are pretty good just as they are!


Tuesday, 2 April 2013

Pavlova Stack with Boozy Berry Sauce


We had a delicious lamb roast cooked for us for our Easter Sunday lunch, with carrots and potatoes from the garden. Spoilt! It was so, so yummy. I was responsible for dessert to conclude this delicious lunch. It was a hard act to follow! You can't beat a good roast. 

I was browsing my latest copy of Food magazine, and spied a recipe for a Meringue Stack and decided that would be a tasty end to our meal. I decided to make a berry sauce to go with it. It was a special occasion, so decided the addition of a little booze wouldn't go amiss. 

Pavlova Stack

5 egg whites, at room temperature
1 and 1/2 cups of sugar
2 teaspoons cornflour
1 teaspoon water
Pinch of salt

Preheat the oven to 100 degrees. Line three oven trays with baking paper and draw a 20cm circle on each sheet of paper (flip this upside down so the pen is on the underside). Now check your oven, make sure you can fit three trays in there! 

Place the egg whites and salt in a bowl and whisk with an electric beater until they reach soft peaks. Continue to beat and add the sugar a spoonful at a time. The meringue will be thick and glossy. Mix in the cornflour and water. 

Divide between the three trays and spread the mixture into a disk into the edges of the circle. Bake them for 90 minutes. Turn the oven off and leave them to cool completely. 

To assemble, layer the meringue disks with cream. I added lemon curd to may layers, but chocolate or even the berry sauce would be delicious. 


Boozy Berry Sauce  

1/2 cup berry jam (I used my homemade boysenberry jam and some raspberry jam)
2 tablespoons booze or orange juice (I used brandy and port)
1 tablespoon water

Gently heat everything in a pot until you have a gorgeous syrupy sauce. Add more water (or booze!) if you want it a bit more runny.  

Enjoy!